Letianpai Smart Switch (with Neutral) User Manual
Product Introduction
The Letianpai Smart Switch (with Neutral) is a smart switch based on the Matter over Wi-Fi protocol, which can be integrated into smart home platforms such as Apple Home, Samsung SmartThings, and Google Home that support the Matter protocol. To connect the Letianpai Smart Switch to various platforms, simply connect it directly to the central hub of the platform under a 2.4Ghz Wi-Fi network; no third-party gateway bridging is required outside of the platform.
The Letianpai Smart Gateway (with Neutral) is a high-power device that complies with the 86-box standard and can directly replace traditional switches in the home. Need household circuits to meet 220V voltage. It requires both the neutral and live wires to be present and powered in the power supply and reserved for wiring and installation. Without a neutral wire, this product cannot be used.
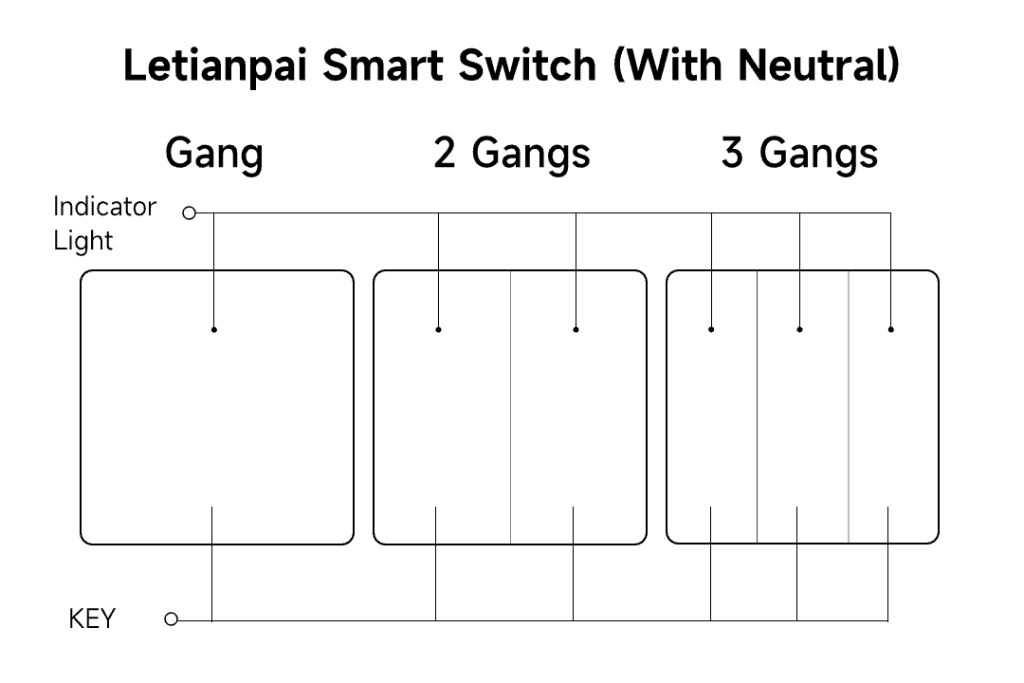
The Letianpai Smart Switch (with Neutral) comes in three models: single, double, and triple, allowing for the selection of the appropriate model. Each switch can be wired to control the lighting of one street lamp.
I. Installation Method
Take the triple switch version as an example for this section. In addition to the neutral wire N and live wire L, the single switch version only has L1, the double switch version has L1 and L2, and the triple switch version has L1, L2, and L3.
Note: Please have a professional electrician perform the wiring and ensure that the main power switch at home is turned off before installation to avoid electric shock.
Step 1:
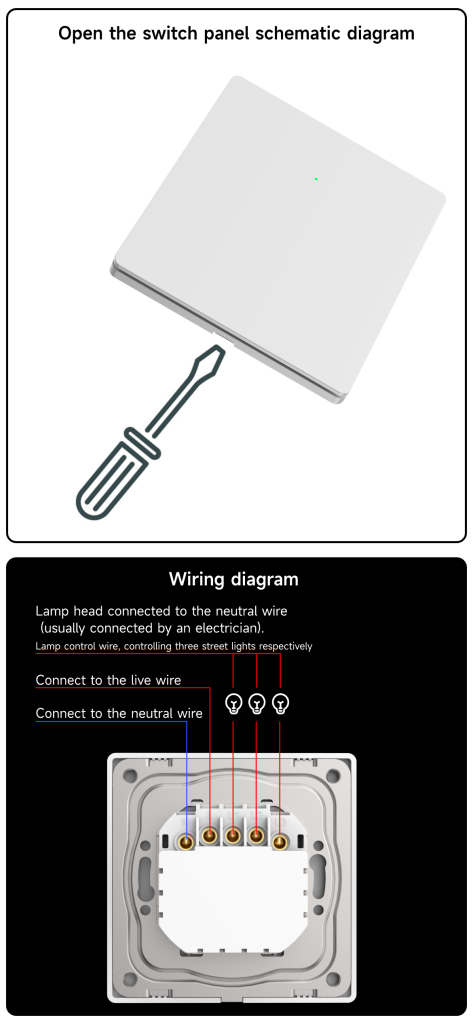
Use a small flat-head screwdriver, align it with the opening of the panel, and gently pry it open.
Step 2:
Identify the switch holes: N represents the hole for connecting the neutral wire of the Letianpai Smart Switch, L represents the live wire hole; L1, L2, and L3 correspond to the wiring holes for the left, middle, and right buttons of the switch, respectively.
Use a screwdriver to loosen the screws on the back of the switch, connect the neutral wire to the N hole, the live wire to the L hole, and the load (lamp) wires to the L1, L2, and L3 holes. After confirming the wiring is correct, tighten the screws on the terminal blocks.
Step 3:
Use the provided screws to align the switch base with the screw holes of the 86 box, then tighten the screws to fix the switch to the wall, and cover the switch with the front panel.
Note: During the process of tightening the screws to fix the base, avoid overtightening which may cause deformation and prevent the switch from being triggered; avoid being too loose which may cause the switch to wobble.
Step 4:
After verifying that the switch wiring is correctly secured, turn on the main power switch. Press each switch button to confirm that it can correctly control the light’s on and off. The indicator light on the switch button can light up and go out synchronously, indicating that the switch is working normally.
If there are no other issues, the switch installation steps are complete. The next step is to add the switch to the Apple Home and other smart home platforms. If the controlled light does not match the actual expectation, please adjust the wiring according to the above four steps.
II. Accessing Apple Home APP
Letianpai Smart Switch (Neutral and Live Version) supports integration with Apple Home, Samsung SmartThings, and other smart home platforms that support Matter. Here, we take Apple Home as an example.
Step 1: Confirm the Access Environment
- Please ensure that there is a stable 2.4GHz Wi-Fi wireless network coverage in the installation environment. This product requires 2.4GHz Wi-Fi for network communication.
- Please ensure that the Apple HomePod mini and other Apple hubs have been successfully added to the Apple Home APP via the 2.4GHz Wi-Fi network and can be used normally.
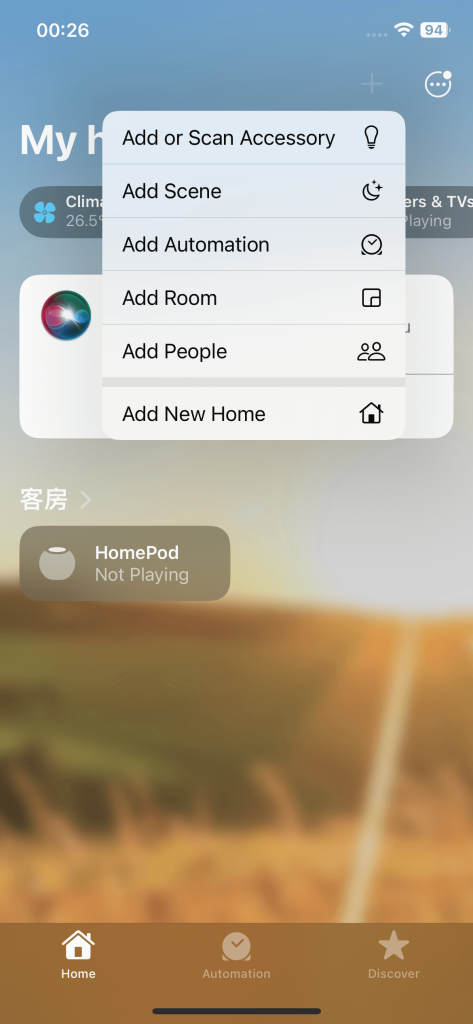
Step 2: Scan and Add to Apple Home
- Open the Apple Home APP, click on the “+” plus sign in the upper right corner, and select “Add or Scan Accessory”;
- Scan the device’s QR code or enter the pairing code to enter the pairing process, and follow the prompts to complete the pairing.
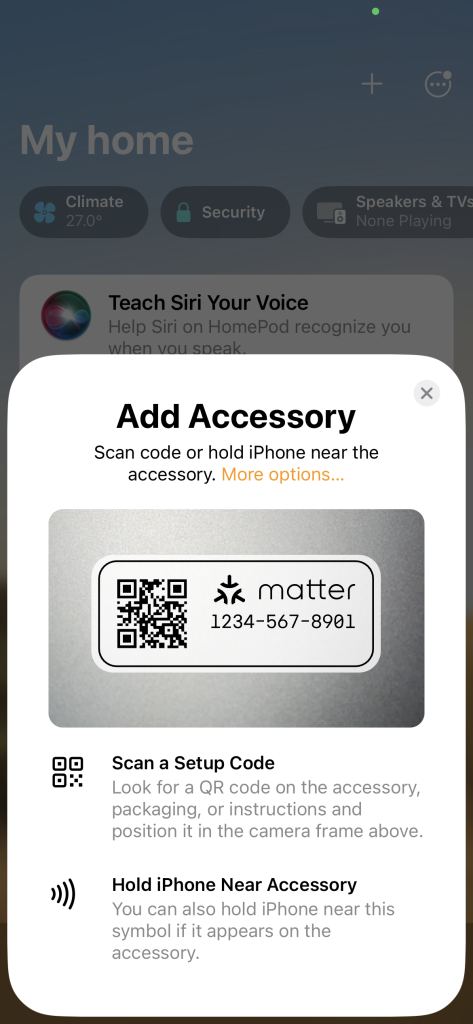
Note: The Matter pairing QR code label is affixed in three places: on the packaging box, the instruction manual, and the lower right side of the switch button, containing both the QR code and the 11-digit manual pairing code. If the Matter QR code label is lost, please use the 11-digit Matter manual pairing code on the switch base for pairing.
III. Device Reset
Press and hold any button of the smart switch for about 10 seconds until the indicator light flashes rapidly, and the device will enter the addable state. Refer to the process of accessing Apple Home to complete the pairing again.
After the reset is complete, the current device previously added to the Apple Home account will no longer be controllable through the APP, and the automations will become invalid.